Tuesday, March 25, 2014

Luscious chocolates box

Hi everyone!

Today’s post brings a little confession: I am a chocoholic! I guess that became clear to me last S. Valentine’s day, when my boyfriend handed me a wonderful (and big) box of chocolates and told me: “I knew you would have enjoyed flowers, but I guess you will like these more!”. That was a very pleasant surprise, because it made me understand how well he truly knows me (ahahah…no! that was a pleasant surprise because I had an entire box of chocolates for me…yummy!!!!!!)…well the deeper meaning also came to my mind, but only after I got the sweets out of my sight ;-).

After some days of intense efforts put into not finishing all those goodies right away, I decided to use this experience as inspiration for a vintage, yummy decoupage box, which I will dedicate to all the chocoholics out there. If you also share this little addiction, or if you know anyone who does, here is a step-by-step tutorial on how to create your own.

Materials:
  • Wooden box
  • Matte basecoat
  • Cream acrylic paint
  • Liquid bitumen (or any other antiquing medium)
  • Decoupage glue
  • Clear sealer
  • Background image (optional) (I used Calambour’s mulberry paper PAU59)
  • Chocolates graphics (I got mine from Calambour’s mulberry paper DGR180)
  • Chocolates label (I used one from Calambour’s paper DGE229)
  • Lace

First of all, I lightly sanded the box surface. I then applied the basecoat and the cream paint, letting dry between coats. I sanded again the entire surface, so that the wood grain would emerge. I tore small pieces of background mulberry paper and glued them sparsely using decoupage glue. Once the piece dried, I added the pastries graphics (both on the inside and on the outside of the box… chocolates are never enough, right?) and the label, before applying 3 coats of clear sealer in order to protect the creation.

I then gave a vintage look to the piece by  using a sponge to apply liquid bitumen on the edges. I advice to always use the antiquing medium after a couple coats of sealer, otherwise the paper, which is more permeable then the wood, might get stained.

To embellish the box, I used decoupage glue to attach the cotton lace around the perimeter of the top. When doing this, I am usually very generous with the quantity of glue I use (I keep brushing it on, until the lace gets soaked). This not only allows for a better bonding, but also makes the lace water (and stain) proof.

And here is my little finished creation!

I hope you like it, and I wish you a very sweet day!

My favorite parties: Under the Table and Dreaming -  Between Naps on the Porch Dwellings Creatively living The dedicated house - Rain on a tin Roof Its So Very Cheri DIY Showoff The Stories of A2Z - Coastal Charm - A Stroll thru Life My Uncommon Slice of Suburbia - Stone Gable Cozy little house  Knick of time -Savvy Southern Style - Ivy and Elaphants Green Willow Pond - Chic by Tab No Minimalist Here From my front porch to yours Craftberry Bush  The Brambleberry Cottage - French Country Cottage Common Ground The Charm of Home The shabby nest Romantic home - Sunny simple life - The cottage market


P.s. If you don’t want to miss any crafty project, remember to follow the blog by clicking on the “join this site” button in the right column ;-)

Monday, March 17, 2014

Spring nest

Hi everyone,

The last days have been wonderful here in Milan, with lots of sunshine and warm afternoons bringing happiness and anticipation for spring’s official start in a couple of days. I therefore decided to I start decorating the house in order to welcome the new season.

I had been looking for a cute, shabby bird cage for a very long time and finally found one last weekend, while walking around the center of the city. The piece was already very nice (you can see how it originally looked like in picture 2), but I still decided to personalize it with little adornments I found at a craft fair, which was also happening this weekend (and here you understand how very joyful the last couple of days must have been ;-) ).

First of all, I weaved an artificial peach flowers branch among the bars of the cage, adding little berry bunches here and there. I then used wire to attach a cute bird and a couple of tiny eggs to a pretty little nest. Last but not least, I created a clay rose to be added between the front bars.

I liked how the piece turned out, but something was still missing. I therefore decoupaged two wooden eggs using Calambour’s wonderful mulberry papers. I chose a sheet of music (PAU 48) and some roses (PAU 75 and PAU 34), which reminded me of the wonderful sound of spring birds’ songs.

I am very pleased with my little creation, which perfectly matches my spring wreath I made yesterday (pictures coming soon) and lightly brings some spring in my room. I hope you will like it too… and wish you a  wonderful, almost-spring day!

My favorite parties: Under the Table and Dreaming -  Between Naps on the Porch Dwellings Creatively living The dedicated house - Rain on a tin Roof Its So Very Cheri DIY Showoff The Stories of A2Z - Coastal Charm - A Stroll thru Life My Uncommon Slice of Suburbia - Stone Gable Cozy little house  Knick of time -Savvy Southern Style - Ivy and Elaphants Green Willow Pond - Chic by Tab No Minimalist Here From my front porch to yours Craftberry Bush  The Brambleberry Cottage - French Country Cottage Common Ground The Charm of Home The shabby nest Romantic home - Sunny simple life - The cottage market


P.s. If you don’t want to miss any crafty project, remember to follow the blog by clicking on the “join this site” button in the right column ;-)

Monday, February 24, 2014

Spring’s perfume

Hi everyone!

The warm sun has finally arrived to brighten up the last days, reminding me that spring will soon be here. I cannot wait to enjoy its colors and perfumes, the buzz of bees, the fragrance of hyacinths and colors of tulips. Being quite of an impatient person, I decided to start bringing the upcoming season in the home, by decorating a jam jar with decoupage, burlap and tiny flowers, creating a potpourri holder in which I placed fragrant lavender seeds.

This creation is quite simple and extremely enjoyable to make. If you want to bring spring in your home too, here are some little instructions for crafting your own.

Materials:
  • Jam jar
  • Glass Primer
  • A background image (optional) (I used Calambour’s mulberry paper PAU36)
  • A lavender graphic (I got mine from Calambour paper EASY292)
  • Decoupage glue (Mod Podge should be ok)
  • Clear sealer
  • Burlap
  • Tulle (optional)
  • Decorations (flowers, ribbons, lace…)
  • Lavender seeds

First of all, you need to apply a coat of glass primer on the entire surface. Once it dried, I tore small pieces of background mulberry paper and glued them sparsely using decoupage glue (picture 2). I let the piece dry, and then added the lavender graphic, before applying 4 coats of clear sealer in order to protect the creation (you can apply less, but I figured out that the inside will get dirty with the seeds, so I might want to clean it sometimes and I should make sure water would not damage the decoration).

I then filled the jar with lavender seeds, and, instead covering with the cap, which would prevent the perfume from spreading around the house, I cut a burlap circle (you should leave about 1 inch of margin on each side) and a tulle one of the same size.

I brushed decoupage glue on the perimeter of the burlap to prevent the fabric from faying and I layered it on the top of tulle. I then fixed it with ribbons and lace around the top of the jar. The little trick is to do this before the glue dries. In this way, you will be able to shape the fabric with your fingers, creating even waves all around the top and the burlap’s perimeter will harden in the right position, so that when you will have to remove it in order to change the seeds inside, it will keep its shape.

Lastly, you can decorate the front as you wish: I added ribbons, al small clay rose and a fake purple flower, matching the shade of the design on the decoupage paper.

And here is my final piece! It really brought a bit of color and perfume in my life and I hope it will do the same for you! I hope you enjoyed this little tutorial :-)

P.s. If you don’t want to miss any crafty project, remember to follow the blog by clicking on the “join this site” button in the right column ;-)

Tuesday, February 11, 2014

Lovely puffy hearts

Hi everyone!

S. Valentine’s day is approaching (I am sure, no one was aware of that!), so today I want to share a little, quick project, which is easy to make and would be a nice present for your loved ones (or maybe for yourself ;-) ).

It’s a cute stuffed heart, which you can easily personalize in so many ways! I will give you all the options I could come up with at the end, but first of all, here are the instructions!

Materials:

  • Fabric
  • Stuffing material
  • Needle
  • Thread
  • Scissors
  • Ribbons and other decorations

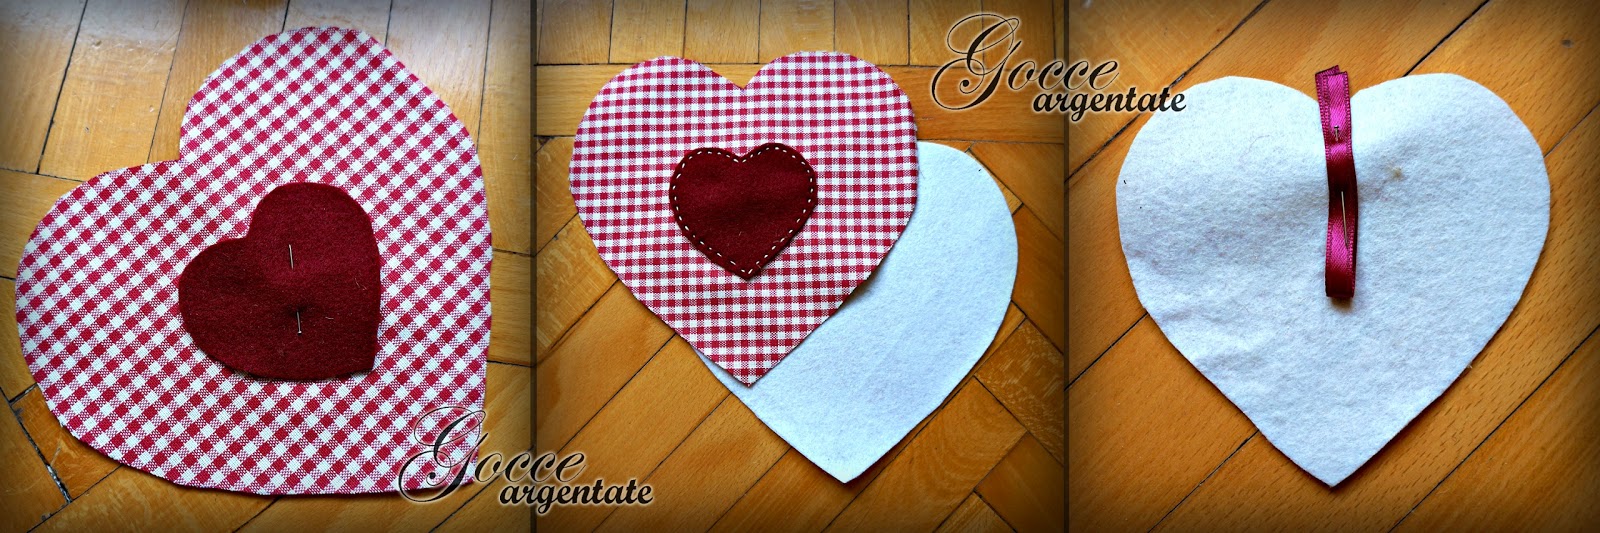
Preparation: cut two pieces of fabric (I used cream felt and checkered cotton) to create two heart shapes of the same dimension. You can chose the size, just remember to leave about 1cm of margin, which you will use to sew them together. Also consider that, when you add stuffing, the size will be reduced. Cut a smaller heart in a fabric that complements (or contrasts) the one you will use for the front (I chose red felt). You can, of course, draw your templates in the shapes and dimensions you wish, but if you want, you can also download the ones I created here.
  • Pin the small heart at the center of the one you wish to use as front (picture1)
  • Using a thick thread in a contrasting color, sew by hand all around the perimeter (picture 2). The advantage of using felt for the heart on top is that it will not fray.
  • If you want to be able to hang the little cushion, pin a ribbon to the fabric you will be using for the back (picture 3). It is very important to pin it correctly, otherwise you will find it in the wrong place once the piece is finished: first of all, fold the ribbon in half. Now, keeping the ends well aligned and on top, pin it to the FRONT of the fabric (the side that will be on the outside of the heart). Leave 1/1.5cm of ribbon ends, so that, once you hang the heart, the ribbon will not fray. Remember to avoid placing the pin too close to where you will be sewing, mostly if you plan on using a sewing machine).


  • Now, align and pin the two hearts together. It is very important to keep on the inside the surface of the fabric that will in the end be on the outside (on other words, the two sides you want to see will now face each other). If you pinned the ribbon, it should now be in between the hearts (picture 4).
  • Sew around the perimeter (you can use a sewing machine), leaving about 1cm margin and an opening on one side (you will need it to flip the heart). I like to leave open a segment which is about 1/3 of the straight line starting from the tip (picture 5).
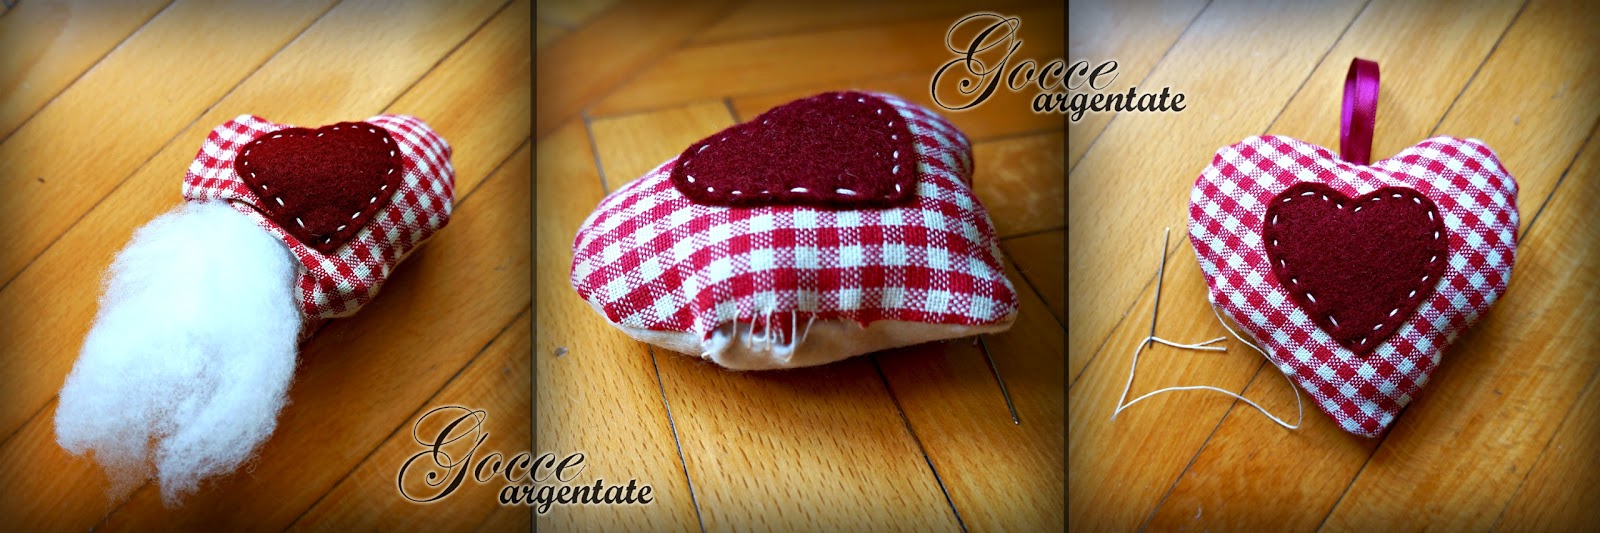
  • Remove the pins and gently turn the heart inside-out. In my opinion, the best way is to start pushing the opposite side through the opening and then slowly roll all the rest of the fabric (picture 6).

  • Stuff the heart from the opening (picture 7).
  • Close the opening with a thread in a matching color (picture 8).
  • And here is your finished heart, ready to be hanged or further embellished :-) ! (picture 9)

Aside from varying the size and shape, or the fabric type and color, many interesting adaptations can be done:

  • You can embellish the heart with flowers, ribbons, buttons… (you can find video tutorials for crocheted flowers here and a pattern for a simple one here).
  • You can scent the creation, by adding lavender to the stuffing (in this case, you can keep the little puffy cushions in your home or wardrobe as air fresheners) or, for a very personalized S Valentine’s day present, you can spray you cologne on it.
  • You can add embroidery on the little heart on the front, or, in the case of a present, when you are sewing, in step 2, you can leave the top open and use it as a pocket to insert a love message.
  • The small hearts also be very nice Christmas ornaments

Here are some of the ones I made. I hope you enjoyed the tutorial, and, if you have any other ideas on the use of these little fluffy creations, please let me know!


P.s. If you don’t want to miss any crafty project, remember to follow the blog by clicking on the “join this site” button in the right column ;-)

Monday, January 27, 2014

Aphrodite bracelet by beadsmagic.com

Hi everyone,

Today I want to share with you a quick pattern. I found this beautiful bracelet on Pinterest and I quickly pinned it onto the FREE patterns group board for future reference. Today, however, a pinner signaled that the picture had a dead link (I hate daed links, so thank you very much!).

I looked for the original pattern on beadsmagic.com, where it was first published, but I could no longer find it. I therefore tried to figure out how to make this little beauty, and here is my interpretation of the pattern. I’m sorry it is not very detailed and professional, but since the creation is not mine, I don’t have many pictures and I do not want to take possession of an idea that was not mine.

Here are the quick instructions and the diagram below should be of help to understand the direction of the threads (if something is not clear, please leave a comment to the post):
  • Row 1: RAW with 2 needles technique, creating picots of 4 seed beads: for each thread add 1 6mm fire-polished bead, 4 size 11/0 seed beads, pass again through the first size 11/0 in the same direction as before, add 1 6mm fire polished, repeat for the other thread and then cross the 2 threads in a size 11/0 (repeat for the entire length of the bracelet)
  • Row 2: pass through the top seed beads of the picots formed in the previous round, adding 1 seed bead, 1 6mm fire-polished bead and another seed bead between one bead and the next.
  • Row 3: pass through the previous round, adding picots exiting from the top beads of round 1 picots

Personally, I would use a thicker thread for the first round, since the beads are heavier and you pass through them only once. I hope you will have fun making this wonderful bracelet, and thanks to beadsmagic.com for creating and sharing the image!

Have a lovely day!


P.s. If you don’t want to miss any crafty project, remember to follow the blog by clicking on the “join this site” button in the right column ;-)

Sunday, December 22, 2013

Decoupaged vintage ornaments

Hi everyone!

Christmas is almost here and I am so excited! These days I had such a great time crafting the last decorations, while listening to Christmas songs, and today I finally completed my tree adding some final ornaments.

The steps I used to complete these little creations are the ones of sphere 1 that you can find here, but this time, instead of buying decorative paper with the manufacturer’s graphics, I had my own designs printed (yayyy!!!!)

It was such a long time I wanted to do it! Each time I visited Graphics Fairy’s website, I was amazed by the gorgeous vintage images she was posting and I kept imagining them decorating my tree. A couple of weeks ago, I decided it was time to stop dreaming and start doing!

First of all, I downloaded 3 beautiful graphics: a cute elf girl, a sweet cat and a lovely dog. I then I cut, resized them, and modified saturation and brightness in order to unify the designs. I also added a common background and small decorative leaves in front of every image, before cropping them in the shape of a circle, so that they would fit on my Christmas plexiglass baubles.

I was able to get everything printed by Calambour, a company located here in Milan that produces mulberry paper. Personally, I really like the job they did: images are crisp, the result professional, and people at their office very helpful, so I will ask them again if I will need more printing. If you wish to print by yourself however, you could use regular paper or try the steps of this tutorial to print on mulberry paper with your inkjet printer.

And here are my beauties! I love how I was finally able to get those gorgeous graphics on my tree…everything turned out just as I wanted (and I am happy, happy, happyyyyy!!!).

I wish you a lovely day and joyful holidays!


P.s. If you don’t want to miss any crafty project, remember to follow the blog by clicking on the “join this site” button in the right column ;-)

Sunday, December 15, 2013

Romantic decoupaged candle dish

Hi everyone!

Today’s creation’s story begins a couple of weeks ago, when walked into one of my favourite shops to get a candle for the vintage candle holder I had just created. I didn’t go there on purpose, so I didn’t have with me the exact measurements of the piece, but I still decided to buy the candle that looked closer to what I needed.

I once again proved that using memory to guess the right size is something I should never do, since apparently, my failure is not limited to my boyfriend’s t-shirts (2 wrong size gifts in a row). When I got home, I indeed realized that the candle was at least twice the size I needed.

I was already planning to return it, when, a couple of days later I found in a thrift store a dish in which it would fit perfectly (I, of course, found out about the fit later, since when I bought it I just thought it was a nice piece to decorate. I guess I would have otherwise got one that was either way too large or definitely too small).

It was a square, very simple and cheap white porcelain plate, but I believed it had potential. When I got home I started working on it. So I will now stop with the chatting and start sharing the instructions on how to make your own!

Materials:
  • Porcelain dish
  • Mulberry paper (for background; I used Calambour PAU 36
  • Decoupage paper (flowers; I used Calambour CAL 95)
  • Primer
  • Decoupage glue (or Mod Podge)
  • Acrylic sealer (clear)
  • Acrylic paints (I used brown, cream and gold)
  • Brushes, scissors…
  • Optional: masking tape

First of all, I decided which area I wanted to embellish and delimitated it using masking tape. This is not mandatory, but it helped me moving around more straight lines. Knowing how clumsy I can be, I left the center of the dish empty, so that if any wax accidentally spills on the plate, it will not ruin the decoration.
You then need to cover with primer the surface you want to work on, so that the paint will stick to it. Once this coat is dry, you can sponge some acrylics in order to create background texture. I made 2 coats, the first with cream only and the second one mixing some 50% brown, 40% cream and 10% gold paints (see picture2).

After everything dried, I used diluted decoupage glue to attach the mulberry paper (previously cut by tearing the perimeter of the 4 stripes making up the sides of the decoration). I then removed the masking tape and defined the internal and external perimeter tracing lines with gold acrylic paint.

To add some extra interest, I cut out 2 flowers from the regular decoupage sheet and glued them on top (in order to get better adherence, you should dampen the designs before applying the glue). To protect the decoration, I covered everything with 2 coats of sealer.

I wasn’t 100% happy with the effect yet, as the different elements were not perfectly blended together. I then decided to take a couple of extra steps: first of all, I thinned some brown paint, until it got a watercolor consistency and applied it in circular motion with a sponge. This helped unifying the colors. I then added 3 coats of sealer, and used very thin sand paper on the flowers in order to get a more even surface…

And voilà! Here is my final creation! I think I will use it as centerpiece for Christmas dinner. I hope you like it!

Have a lovely day, and come back soon!

P.s. If you don’t want to miss any crafty project, remember to follow the blog by clicking on the “join this site” button in the right column ;-)

Sunday, December 8, 2013

New RAW bracelets

Hi everyone!

Today  I want to show you  some brand new bracelets I accidentally created this afternoon. I say “accidentally”, because this wasn’t the plan! This morning I indeed started with the good intention to spend the day finishing ornaments for my Christmas tree. Everything however rapidly changed as I accidentally clicked on my Pinterest shortcut. After days of baubles, candle holders, ribbons and bows, seeing the beauties I had pinned on my jewelry boards, made me crave for beads, so I had to quickly take out all my supplies and start working.

I have to admit it was very refreshing and I am extremely satisfied of the result…so here are my two little beauties inspired by two pieces which you can see on my bracelets board. They both use right angle weave, but with extremely different beads and motives: the first one has as main feature some champagne 2-hole twins and 3mm bronze round beads creating little flowers, with size 15/0 bronze and pearl seed beads adding a frame finely decorated with tiny picots.

For the second bracelet, I instead used 6mm Czech fire-polished beads in 3 different shades of brown, all kept together by matte brown and metallic bronze size 11/0 seed beads. You could use 1 color of fire-polished only, but I think that combining different ones adds some interest to the pattern.

And here are the pictures! I hope you like them, and don’t forget to visit my Pinterest boards for more inspiration.

Have a lovely day!


P.s. If you don’t want to miss any crafty project, remember to follow the blog by clicking on the “join this site” button in the right column ;-)

Friday, November 29, 2013

Decoupaged Christmas ornaments

Hi everyone! 

Today I want to show you some Christmas ornaments I have been making lately, using decoupage mulberry paper. I love the versatility of this technique: you can get a totally different look just by changing the image and some other small details.

To create these spheres you will need:
  • Plexiglass spheres (glass ones are good as well, I use plexiglass because they can be opened in half, so you can be attaching the paper on the inside, as I did for the ornaments in picture 6 and 7)
  • Decoupage glue (I think Mod Podge would be ok)
  • Mulberry paper with Christmas prints
  • Clear acrylic sealer 
  • Decorations (ribbons, pine cones, berries, flowers...) 
  • For sphere in pictures 1 to 5 ONLY, you will also need plain mulberry paper (without any prints, I used a cream color) 
  • For sphere in pictures 6 and 7 ONLY, you will also need: glass primer, fake snow paste
Here you can see a tutorial (my very first tutorial, yayyy!!! :-) for creating your own ornaments. It is in Italian, but just below the box, I wrote full instructions in English :-).


Sphere 1 (pictures 1 to 5):

First of all, I tore some plain mulberry paper, in order to get small pieces with uneven borders. I then used decoupage glue to stick them to the sphere until the entire surface was covered.

Once dry, I glued an image printed on mulberry paper (which I got from a Calambour decoupage sheet I found on Nom de Plume website). I then let the sphere dry and added a coat of acrylic sealer.

To further embellish the creation, I used hot glue to attach some ribbons, bows and flowers (you can find instructions on how to make the crocheted flower here).

Sphere 2 (pictures 6-7):

First of all, I used decoupage glue to attach some decorated mulberry paper, but this time I worked on the inside of the sphere: I opened the ball and attached the decoration on the two separate halves, keeping the printed side facing the plexiglass surface (I used images that would cover all the space, but you can cut some smaller prints and eventually add an extra layer of plain paper on top).

I then let the sphere dry and added a coat of acrylic sealer. I later painted the surface with cream acrylics, in order to make the design more opaque, so that the colors would be more brilliant.

After closing the ornament, I covered the borders with glass primer and brushed some white snow paste, before sealing everything with clear acrylic sealer.

To further embellish the creation, I used hot glue to attach some ribbons, bows and pine cones. 

Here are some pictures of my tree ornaments. I hope you enjoyed this little tutorial. Have fun and come back soon!


Featured on:


My favorite parties: The Shabby Creek Cottage - Dwellings - From my front porch to yours - The Charm of Home - Between Naps on the Porch - Green Willow Pond - Ivy and Elephants - Coastal Charm - A Stroll Thru Life - Cozy Little House - Stone Gable - My Uncommon Slice of Suburbia - Knick of Time - No Minimalist Here - The Brambleberry Cottage - Common Ground - French Country Cottage - Its so Very Cheri - Rain on a Tin Roof - The Dedicated House


P.s. If you don’t want to miss any crafty project, remember to follow the blog by clicking on the “join this site” button in the right column ;-)